

A router, in the context of web development, is a software component or library that handles the routing or navigation functionality in a web application. It is responsible for determining which content or components should be displayed to the user based on the current URL or route. Same way React Router, plays a crucial role in web development by efficiently handling navigation in a web application.
Introduction
React Router is a popular routing library for React applications. It provides a way to handle navigation and routing within a React application by mapping specific URLs to corresponding components. React Router allows you to create a single-page application with multiple views or pages, where each view is associated with a specific URL.
Staring with React Router
To begin, you need to install React Router in your project. By utilizing package managers like npm or yarn, you can easily add React Router to your application’s dependencies. Run this command in your React project directory:
- While using npm: npm install react-router-dom
- For yarn: yarn add react-router-dom
Components Provided by React Router
BrowserRouter
BrowserRouter component provides the routing functionality needed for React Router to work. To enable React Router for handling navigation in your application, wrap your components with the BrowserRouter component.
Route
Routes serve as the paths that map to specific components in your application. You can define routes using the Route component provided by React Router. For example, if you want to create a home route (“/”) and an about route (“/about”), you can write the following code:

The exact prop is used to ensure that the component is only rendered when the URL matches exactly.
After defining the routes, you can create the corresponding components to be rendered when those routes are accessed. In this case, let’s create a Home component and an About component.


Link
Now that the routes and components are set up, you can create navigation links using the Link component provided by React Router. The Link component allows you to navigate between routes without causing a full page reload. For example, you can create navigation links in a navigation bar component like this:
By clicking on these links, the corresponding components will be rendered based on the defined routes.
Switch
Additionally, React Router allows you to handle routes that don’t match any defined paths. You can achieve this by using the Switch component. By wrapping your routes with Switch and including a Route component without a path prop at the end, you can create a “Not Found” route that will be displayed when none of the other routes match.

useHistory Hook
Lastly, if you need to navigate programmatically in your React components, React Router provides a history object. You can access it using the useHistory hook. With the history object, you can navigate to different routes based on certain events or user interactions.

By following these basic steps, you can handle navigation within your React application using React Router.
Additional Components Provided by React Router:
Redirect
This component is used to redirect the user to a different route. It renders a new location and replaces the current location in the history stack.
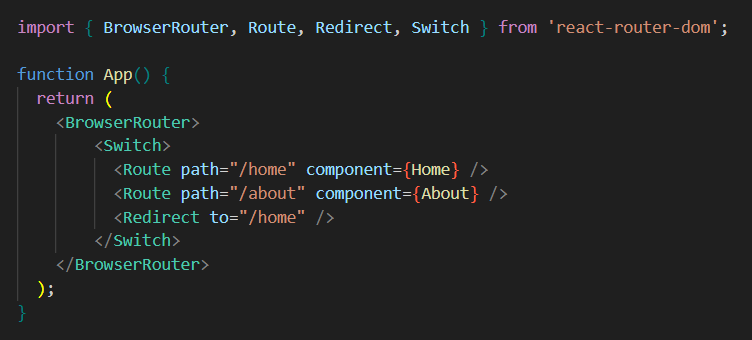
In this example, we have two routes defined: /home and /about. If the user visits any other route, such as /, the Redirect component will be triggered and redirect the user to the /home route.
NavLink
This component is similar to the Link component but provides additional styling options for the active link. It adds an active class to the rendered element when it matches the current URL

withRouter
This higher-order component (HOC) is used to access the router props outside of the rendered components. It allows you to access the history, location, and match objects without having to pass them down as props.

With React Router, you can perform tasks such as:
- Routing: Define routes and associate them with specific components. Routes determine which component should be rendered based on the current URL.
- Nested Routing: Create nested routes to represent hierarchical page structures within your application.
- URL Parameters: Extract dynamic parameters from the URL and pass them as props to the corresponding components.
- Query Parameters: Access and utilize query parameters from the URL to modify component behavior or fetch data.
- Navigation: Provide navigation links and buttons that allow users to navigate between different views or pages within your application.
- Programmatic Navigation: Programmatically navigate to different routes based on events or user interactions within your components.
- Route Guards: Implement authentication or authorization checks before allowing access to specific routes or components.
- History Manipulation: Access and modify the browser’s history to enable actions such as going back or forward programmatically.
React Router is a powerful tool specifically designed for simplifying navigation in your React applications. For more advanced features such as nested routes, route parameters, and query parameters, I recommend exploring the React Router documentation at https://reactrouter.com/en/main. Happy navigating!